Static Website CloudFormation Template

The template: static.website.cloudformation.json

Click here to launch your static website on AWS

What is a static website and why are they cool?

A static website is simply html, css, js,… files hosted by AWS S3. They are cool because there are no servers for you to maintain and pay for. You only pay for the storage of your files and the amount of traffic your site gets. Security is greatly improved because your site has no servers or databases to hack into.

What AWS resources does this template use?

  • S3 (File storage & static website)
  • CloudFront (HTTPS & caching)
  • Certificate Manager (SSL Cert)
  • Route53 (DNS)
  • CodeBuild (Continuous deployment)
  • CodePipeline (Continuous deployment)
  • CodeCommit (GIT repo)
  • CloudFormation (Infrastructure as Code)
  • IAM (AWS permissions & users)

This seems like a lot just to host a static website! Yep, it is, that’s why I created this handy CloudFormation template so the next time I want to stand up a simple static website I just have to click the button above.

How do I get started?

Step 1 - Create your AWS account

The first step is to create an AWS account.

Step 2 - Create your IAM user

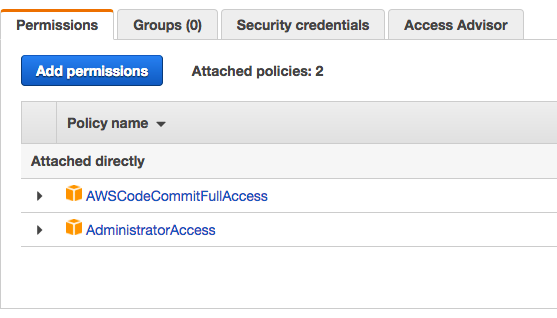
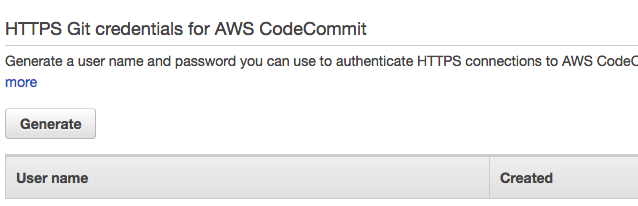
Once you’re logged into your account you need to create an IAM user with Programmatic access, and with AWSCodeCommitFullAccess & AdministratorAccess permissions. Also, your user will need CodeCommit (GIT) credentials. Don’t forget to download all of your credentials because you’ll need then later. See the screen shots below:

Step 3 - Purchase your domain name

Head on over to Route 53 and register your domain name. If you already have a domain name, don’t worry, you can point it at Route53 after you build the stack.

Step 4 - Build the stack

Click on the buttom at the top to build the stack. Use your domain name and app name as the input parameters.

You can also copy the cloudformation template and install the stack using the AWS command-line tools. Harder but recommended. You should really version control your IaC template as well as your code. Here are the commands to create, update, and delete the stack.

Create Stack

1
2
3
4
5
6
7
aws cloudformation create-stack \
--stack-name <example-com> \
--template-body file:///<abs_path>/static.website.cloudformation.json \
--parameters ParameterKey=ApexDomainName,ParameterValue=<example.com> ParameterKey=AppName,ParameterValue=<example> \
--tags=Key=app,Value=<example.com> \
--capabilities CAPABILITY_IAM \
--profile <profile>

Delete Stack

1
2
3
aws cloudformation delete-stack \
--stack-name <example-com> \
--profile <profile>

Update Stack

1
2
3
4
5
6
7
aws cloudformation update-stack \
--stack-name <example-com> \
--template-body file:///<abs_path>/static.website.cloudformation.json \
--parameters ParameterKey=ApexDomainName,ParameterValue=<example.com> ParameterKey=AppName,ParameterValue=<example> \
--tags=Key=app,Value=<example.com> \
--capabilities CAPABILITY_IAM \
--profile <profile>

Step 5 - Validate domain ownership

When AWS Certificate Manager creates your SSL certificate it sends and email to the domain name administrator (You). You have to get that email and click the confirmation link. Once this step has been completed the stack can continue being built. More information can be found here: http://docs.aws.amazon.com/acm/latest/userguide/gs-acm-validate.html

Step 6 - Wait for your stack to be built

Check the progress of your stack here: https://console.aws.amazon.com/cloudformation/home

Once your stack has been built copy the output param which will be your CodeCommit repo URL.

What do I do after my stack has been created?

Use your CodeCommit repo and your CodeCommit credentials to start checking in your static site.

CodePipeline and CodeBuild are setup to continuously deploy your site as you push changes to your repo.

Branches and CodePipeline actions:
master -> Pushes changes to APEX (yes ssl)
develop -> Pushes changes to dev subdomain (no ssl)

What should the structure of my project be?

Great question. You need to add a buildspec.yml so CodeBuid knows how to build your project.

/www/assets/ -> Put all js, css, images, etc… in this folder.
/www/index.html -> Put all html files in this folder.
buildspec.yml -> CodeBuild uses this to build your project.

buildspec.yml

1
2
3
4
5
6
7
8
9
10
11
12
version: 0.1
phases:
install:
commands:
pre_build:
commands:
build:
commands:
- aws s3 sync www "s3://${BUCKET_NAME}" --acl bucket-owner-full-control --acl public-read --delete --cache-control "max-age=1" --exclude www/assets
- aws s3 sync www/assets "s3://${BUCKET_NAME}/assets" --acl bucket-owner-full-control --acl public-read --delete --cache-control "max-age=31536000"
post_build:
commands:

Can you explain the different parts of the template?

I thought you’d never ask. Here goes.

Mappings

The mappings section allows you to add data to your template that you’ll need to lookup later… Like information based on availability zones. In our case we needed to lookup the S3 hosted zone ID given the availability zone we’re deploying to. Why doesn’t AWS make this info available by default? Good question, why not AWS?

1
2
3
4
5
6
7
8
9
10
11
12
13
14
15
16
17
18
19
20
21
22
23
24
25
26
27
28
29
30
31
32
33
34
35
36
"Mappings": {
"RegionMap": {
"us-east-1": {
"S3hostedzoneID": "Z3AQBSTGFYJSTF",
"websiteendpoint": "s3-website-us-east-1.amazonaws.com"
},
"us-west-1": {
"S3hostedzoneID": "Z2F56UZL2M1ACD",
"websiteendpoint": "s3-website-us-west-1.amazonaws.com"
},
"us-west-2": {
"S3hostedzoneID": "Z3BJ6K6RIION7M",
"websiteendpoint": "s3-website-us-west-2.amazonaws.com"
},
"eu-west-1": {
"S3hostedzoneID": "Z1BKCTXD74EZPE",
"websiteendpoint": "s3-website-eu-west-1.amazonaws.com"
},
"ap-southeast-1": {
"S3hostedzoneID": "Z3O0J2DXBE1FTB",
"websiteendpoint": "s3-website-ap-southeast-1.amazonaws.com"
},
"ap-southeast-2": {
"S3hostedzoneID": "Z1WCIGYICN2BYD",
"websiteendpoint": "s3-website-ap-southeast-2.amazonaws.com"
},
"ap-northeast-1": {
"S3hostedzoneID": "Z2M4EHUR26P7ZW",
"websiteendpoint": "s3-website-ap-northeast-1.amazonaws.com"
},
"sa-east-1": {
"S3hostedzoneID": "Z31GFT0UA1I2HV",
"websiteendpoint": "s3-website-sa-east-1.amazonaws.com"
}
}
},

Parameters

Parameters are optional values that you can pass into your template. For use we passed in the domain name. This way we could use this template to setup many different static websites.

1
2
3
4
5
6
7
8
9
10
11
12
"Parameters": {
"ApexDomainName": {
"Description": "Domain name for your website (example.com)",
"Type": "String",
"Default": "example.com"
},
"AppName": {
"Description": "App name for your website (example). Only alphanumeric characters, dash, and underscore are supported.",
"Type": "String",
"Default": "example"
}
},

Resources

The set of AWS resources you want to include in the stack. Lets walk through each resource we used and how they relate to each other.

S3 Bucket

First we need to create the S3 buckets

The root bucket hosts our static site at the domain apex (example.com).

  • DeleteionPolicy: Retain -> Don’t delete our bucket when we delete this stack.
  • BucketName: {“Ref”:”ApexDomainName”} -> Here we reference the parameter passed in.
1
2
3
4
5
6
7
8
9
10
11
12
13
14
"RootBucket": {
"Type": "AWS::S3::Bucket",
"DeletionPolicy": "Retain",
"Properties": {
"BucketName": {
"Ref": "ApexDomainName"
},
"AccessControl": "PublicRead",
"WebsiteConfiguration": {
"IndexDocument": "index.html",
"ErrorDocument": "404.html"
}
}
},

The www subdomain redirects to our apex domain.

  • Join -> Function that adds ‘www.’ to our apex domain and uses that as the bucket name.
  • RedirectAllRequestsTo -> Redirect all requests to our apex domain.
1
2
3
4
5
6
7
8
9
10
11
12
13
14
15
16
17
18
19
20
21
22
23
24
"WWWBucket": {
"Type": "AWS::S3::Bucket",
"Properties": {
"BucketName": {
"Fn::Join": [
"",
[
"www.",
{
"Ref": "ApexDomainName"
}
]
]
},
"AccessControl": "BucketOwnerFullControl",
"WebsiteConfiguration": {
"RedirectAllRequestsTo": {
"HostName": {
"Ref": "RootBucket"
}
}
}
}
},

We create a dev. subdomain as well. This is where we will do our QA and testing.

1
2
3
4
5
6
7
8
9
10
11
12
13
14
15
16
17
18
19
20
21
22
"DevBucket": {
"Type": "AWS::S3::Bucket",
"DeletionPolicy": "Retain",
"Properties": {
"BucketName": {
"Fn::Join": [
"",
[
"dev.",
{
"Ref": "ApexDomainName"
}
]
]
},
"AccessControl": "PublicRead",
"WebsiteConfiguration": {
"IndexDocument": "index.html",
"ErrorDocument": "404.html"
}
}
},

The ArtifactBucket is needed by CodePipeline during the continuous deployments

1
2
3
4
5
6
7
"ArtifactBucket": {
"Type": "AWS::S3::Bucket",
"DeletionPolicy": "Delete",
"Properties": {
"AccessControl": "Private"
}
},

SSL

We need to create an SSL certificate to use with our apex domain. Pretty cool that AWS gives us a free SSL cert and cycles them for us when they expire. No more are they days of creating our own Certificate Request and sending it to GoDaddy.

1
2
3
4
5
6
7
8
9
10
11
12
13
14
15
16
17
18
19
20
21
"SSL": {
"Type": "AWS::CertificateManager::Certificate",
"Properties": {
"DomainName": {
"Ref": "RootBucket"
},
"SubjectAlternativeNames": [
{
"Fn::Join": [
"",
[
"www.",
{
"Ref": "ApexDomainName"
}
]
]
}
]
}
},

CloudFront

We use a Content Delivery Network (CDN) for two reasons:

  • It caches our web assets, html, css, js, and image files at the edge
  • It handles our SSL certificate and termination

Our source is the apex S3 website. Besides the default behavior we added two additional behaviors for .js and .css files. For these files we want to use the query params within the cache key. I like to cache these files for a really long time. The only catch is that when you make changes to these files you have to add a version query param to the url when you request them in your html pages. Ex. /css/app.css?v=2. It is a good practice to just dynamically change this version every time you deploy.

1
2
3
4
5
6
7
8
9
10
11
12
13
14
15
16
17
18
19
20
21
22
23
24
25
26
27
28
29
30
31
32
33
34
35
36
37
38
39
40
41
42
43
44
45
46
47
48
49
50
51
52
53
54
55
56
57
58
59
60
61
62
63
64
65
66
67
68
69
70
71
72
73
74
75
76
77
78
79
80
81
82
83
84
85
86
87
88
89
90
91
92
93
94
95
96
97
98
99
100
101
102
103
104
105
106
107
108
109
110
111
112
113
114
115
116
117
118
119
120
121
122
123
124
125
126
"CDN": {
"Type": "AWS::CloudFront::Distribution",
"Properties": {
"DistributionConfig": {
"Aliases": [
{
"Ref": "ApexDomainName"
}
],
"Enabled": true,
"PriceClass": "PriceClass_All",
"CacheBehaviors": [
{
"TargetOriginId": {
"Ref": "RootBucket"
},
"PathPattern": "*.js",
"ViewerProtocolPolicy": "redirect-to-https",
"MinTTL": 0,
"AllowedMethods": [
"HEAD",
"GET"
],
"CachedMethods": [
"HEAD",
"GET"
],
"ForwardedValues": {
"QueryString": true,
"Cookies": {
"Forward": "none"
}
}
},
{
"TargetOriginId": {
"Ref": "RootBucket"
},
"PathPattern": "*.css",
"ViewerProtocolPolicy": "redirect-to-https",
"MinTTL": 0,
"AllowedMethods": [
"HEAD",
"GET"
],
"CachedMethods": [
"HEAD",
"GET"
],
"ForwardedValues": {
"QueryString": true,
"Cookies": {
"Forward": "none"
}
}
}
],
"DefaultCacheBehavior": {
"TargetOriginId": {
"Ref": "RootBucket"
},
"ViewerProtocolPolicy": "redirect-to-https",
"MinTTL": 0,
"AllowedMethods": [
"HEAD",
"GET"
],
"CachedMethods": [
"HEAD",
"GET"
],
"ForwardedValues": {
"QueryString": false,
"Cookies": {
"Forward": "none"
}
}
},
"Origins": [
{
"DomainName": {
"Fn::Join": [
".",
[
{
"Ref": "ApexDomainName"
},
{
"Fn::FindInMap": [
"RegionMap",
{
"Ref": "AWS::Region"
},
"websiteendpoint"
]
}
]
]
},
"Id": {
"Ref": "RootBucket"
},
"CustomOriginConfig": {
"HTTPPort": "80",
"HTTPSPort": "443",
"OriginProtocolPolicy": "http-only"
}
}
],
"Restrictions": {
"GeoRestriction": {
"RestrictionType": "none",
"Locations": [
]
}
},
"ViewerCertificate": {
"SslSupportMethod": "sni-only",
"MinimumProtocolVersion": "TLSv1",
"AcmCertificateArn": {
"Ref": "SSL"
}
}
}
}
},

Route53

We need to create 3 DNS routes.

  • Apex domain -> CloudFront
  • www sub domain -> www S3 endpoint so S3 does the redirect to Apex
  • dev sub domain -> straight to the dev S3 endpoint. No caching, no SSL
1
2
3
4
5
6
7
8
9
10
11
12
13
14
15
16
17
18
19
20
21
22
23
24
25
26
27
28
29
30
31
32
33
34
35
36
37
38
39
40
41
42
43
44
45
46
47
48
49
50
51
52
53
54
55
56
57
58
59
60
61
62
63
64
65
66
67
68
69
70
71
72
73
74
75
76
77
78
79
80
81
82
83
84
85
86
87
88
89
90
91
92
93
94
95
96
97
98
99
100
101
102
103
104
105
106
107
108
"DNS": {
"Type": "AWS::Route53::RecordSetGroup",
"Properties": {
"HostedZoneName": {
"Fn::Join": [
"",
[
{
"Ref": "ApexDomainName"
},
"."
]
]
},
"Comment": "Zone apex alias.",
"RecordSets": [
{
"Name": {
"Ref": "ApexDomainName"
},
"Type": "A",
"AliasTarget": {
"HostedZoneId": "Z2FDTNDATAQYW2",
"DNSName": {
"Fn::GetAtt": [
"CDN",
"DomainName"
]
}
}
},
{
"Name": {
"Fn::Join": [
"",
[
"www.",
{
"Ref": "ApexDomainName"
}
]
]
},
"Type": "CNAME",
"TTL": "900",
"ResourceRecords": [
{
"Fn::Join": [
".",
[
"www",
{
"Ref": "ApexDomainName"
},
{
"Fn::FindInMap": [
"RegionMap",
{
"Ref": "AWS::Region"
},
"websiteendpoint"
]
}
]
]
}
]
},
{
"Name": {
"Fn::Join": [
"",
[
"dev.",
{
"Ref": "ApexDomainName"
}
]
]
},
"Type": "CNAME",
"TTL": "900",
"ResourceRecords": [
{
"Fn::Join": [
".",
[
"dev",
{
"Ref": "ApexDomainName"
},
{
"Fn::FindInMap": [
"RegionMap",
{
"Ref": "AWS::Region"
},
"websiteendpoint"
]
}
]
]
}
]
}
]
}
},

CodeCommit

Now we need to create our GIT repo. We’ll use our GIT repo to trigger CodePipeline and CodeBuild to perform our continuous deployments on checkin.

1
2
3
4
5
6
7
8
9
10
11
12
13
14
15
16
17
18
19
"GIT": {
"Type": "AWS::CodeCommit::Repository",
"Properties": {
"RepositoryDescription": {
"Fn::Join": [
" ",
[
{
"Ref": "ApexDomainName"
},
"Code Repository"
]
]
},
"RepositoryName": {
"Ref": "ApexDomainName"
}
}
},

CodeBuild

The CodeBuild is the thing that actually uploads our website into S3. CodePipeline will hand CodeBuild all the files in the GIT repo and CodeBuild does its thing…

1
2
3
4
5
6
7
8
9
10
11
12
13
14
15
16
17
18
19
20
21
22
23
24
25
26
27
28
29
30
31
32
33
34
35
36
37
38
39
"CodeBuildRoot": {
"Type": "AWS::CodeBuild::Project",
"Properties": {
"Artifacts": {
"Type": "CODEPIPELINE"
},
"Environment": {
"ComputeType": "BUILD_GENERAL1_SMALL",
"Image": "aws/codebuild/ubuntu-base:14.04",
"Type": "LINUX_CONTAINER",
"EnvironmentVariables": [
{
"Name": "BUCKET_NAME",
"Value": {
"Ref": "RootBucket"
}
}
]
},
"Name": {
"Fn::Join": [
"_",
[
{
"Ref": "AppName"
},
"Root_Build"
]
]
},
"ServiceRole": {
"Ref": "CodeBuildRole"
},
"Source": {
"Type": "CODEPIPELINE"
},
"TimeoutInMinutes": 10
}
},

CodeBuild uses a buildspec.yml to perform the build. Here is our buildspec.yml This file has to be in the root of your project repo.

1
2
3
4
5
6
7
8
9
10
11
12
version: 0.1
phases:
install:
commands:
pre_build:
commands:
build:
commands:
- aws s3 sync www "s3://${BUCKET_NAME}" --acl bucket-owner-full-control --acl public-read --delete --cache-control "max-age=1" --exclude www/assets
- aws s3 sync www/assets "s3://${BUCKET_NAME}/assets" --acl bucket-owner-full-control --acl public-read --delete --cache-control "max-age=31536000"
post_build:
commands:

CodePipeline

Our CodePipeline has two stages.

  • The first stage is triggered by a GIT push to the master branch of our repo. This stage simply hands the next stage all the files in our repo.
  • The second stage is our CodeBuild which runs the buildspec.yml and uploads all the files to S3.
1
2
3
4
5
6
7
8
9
10
11
12
13
14
15
16
17
18
19
20
21
22
23
24
25
26
27
28
29
30
31
32
33
34
35
36
37
38
39
40
41
42
43
44
45
46
47
48
49
50
51
52
53
54
55
56
57
58
59
60
61
62
63
64
65
66
67
68
69
70
71
72
73
"CodePipelineRoot": {
"Type": "AWS::CodePipeline::Pipeline",
"Properties": {
"RoleArn": {
"Fn::GetAtt": [
"CodePipelineRole",
"Arn"
]
},
"Stages": [
{
"Name": "Source",
"Actions": [
{
"Name": "SourceAction",
"ActionTypeId": {
"Category": "Source",
"Owner": "AWS",
"Version": "1",
"Provider": "CodeCommit"
},
"OutputArtifacts": [
{
"Name": "StaticSiteSource"
}
],
"Configuration": {
"BranchName": "master",
"RepositoryName": {
"Fn::GetAtt": [
"GIT",
"Name"
]
}
},
"RunOrder": 1
}
]
},
{
"Name": "Build",
"Actions": [
{
"Name": "BuildRoot",
"InputArtifacts": [
{
"Name": "StaticSiteSource"
}
],
"ActionTypeId": {
"Category": "Build",
"Owner": "AWS",
"Version": "1",
"Provider": "CodeBuild"
},
"Configuration": {
"ProjectName": {
"Ref": "CodeBuildRoot"
}
},
"RunOrder": 1
}
]
}
],
"ArtifactStore": {
"Type": "S3",
"Location": {
"Ref": "ArtifactBucket"
}
}
}
},

Outputs

Send information to the outputs section of this stack so we can easily access it. In this case we need the CodeCommit repo url so we can start coding.

1
2
3
4
5
6
7
8
9
10
11
"Outputs": {
"WebsiteURL": {
"Value": {
"Fn::GetAtt": [
"GIT",
"CloneUrlHttp"
]
},
"Description": "CodeCommit URL"
}
}
avatar

Randy Findley

An Engineering Blog